
Adhesive dentistry
Adhesive dentistry connects a biological substrate to a restorative material. Reliable bonding depends on substrate assessment, contamination control and the complete product-specific protocol.
Quick revision summary
Enamel and dentine are different substrates
Enamel is highly mineralised. Acid conditioning creates a micro-retentive surface into which resin can penetrate, supporting durable micromechanical bonding when the surface is clean and the adhesive is used correctly.
Application, solvent removal and light delivery
The adhesive must reach the entire intended surface in the manner specified, often with active application. Solvent evaporation and layer control are distinct steps; a glossy appearance alone does not prove adequate solvent removal.
Troubleshoot sensitivity and interface failure
Postoperative sensitivity can arise from pulpal inflammation, occlusal loading, cracks, exposed dentine or an imperfect seal. Examine the pattern, duration, stimuli, margins, contact and pulp before deciding that bonding failed.
Common mistake
“Universal adhesive” does not mean universal instructions. Moisture control, solvent evaporation, compatible chemistry and adequate cure must all be achieved.
Adhesive dentistry
Adhesive dentistry connects a biological substrate to a restorative material. Reliable bonding depends on substrate assessment, contamination control and the complete product-specific protocol.
Enamel and dentine are different substrates
Enamel is highly mineralised. Acid conditioning creates a micro-retentive surface into which resin can penetrate, supporting durable micromechanical bonding when the surface is clean and the adhesive is used correctly. The quality and amount of enamel differ between an intact margin, an old restoration edge and a hypomineralised surface, so do not assume every visible enamel strip provides equivalent support.
Dentine contains mineral, collagen, water and fluid-filled tubules. Its depth, sclerosis, caries history and moisture affect bonding. Adhesive infiltration must form a suitable interface with the conditioned tissue while controlling solvent and water. The phrase bond to tooth hides these differences and is insufficient to explain why the same material can behave differently at cervical and enamel-rich margins.
The pulp–dentine interface
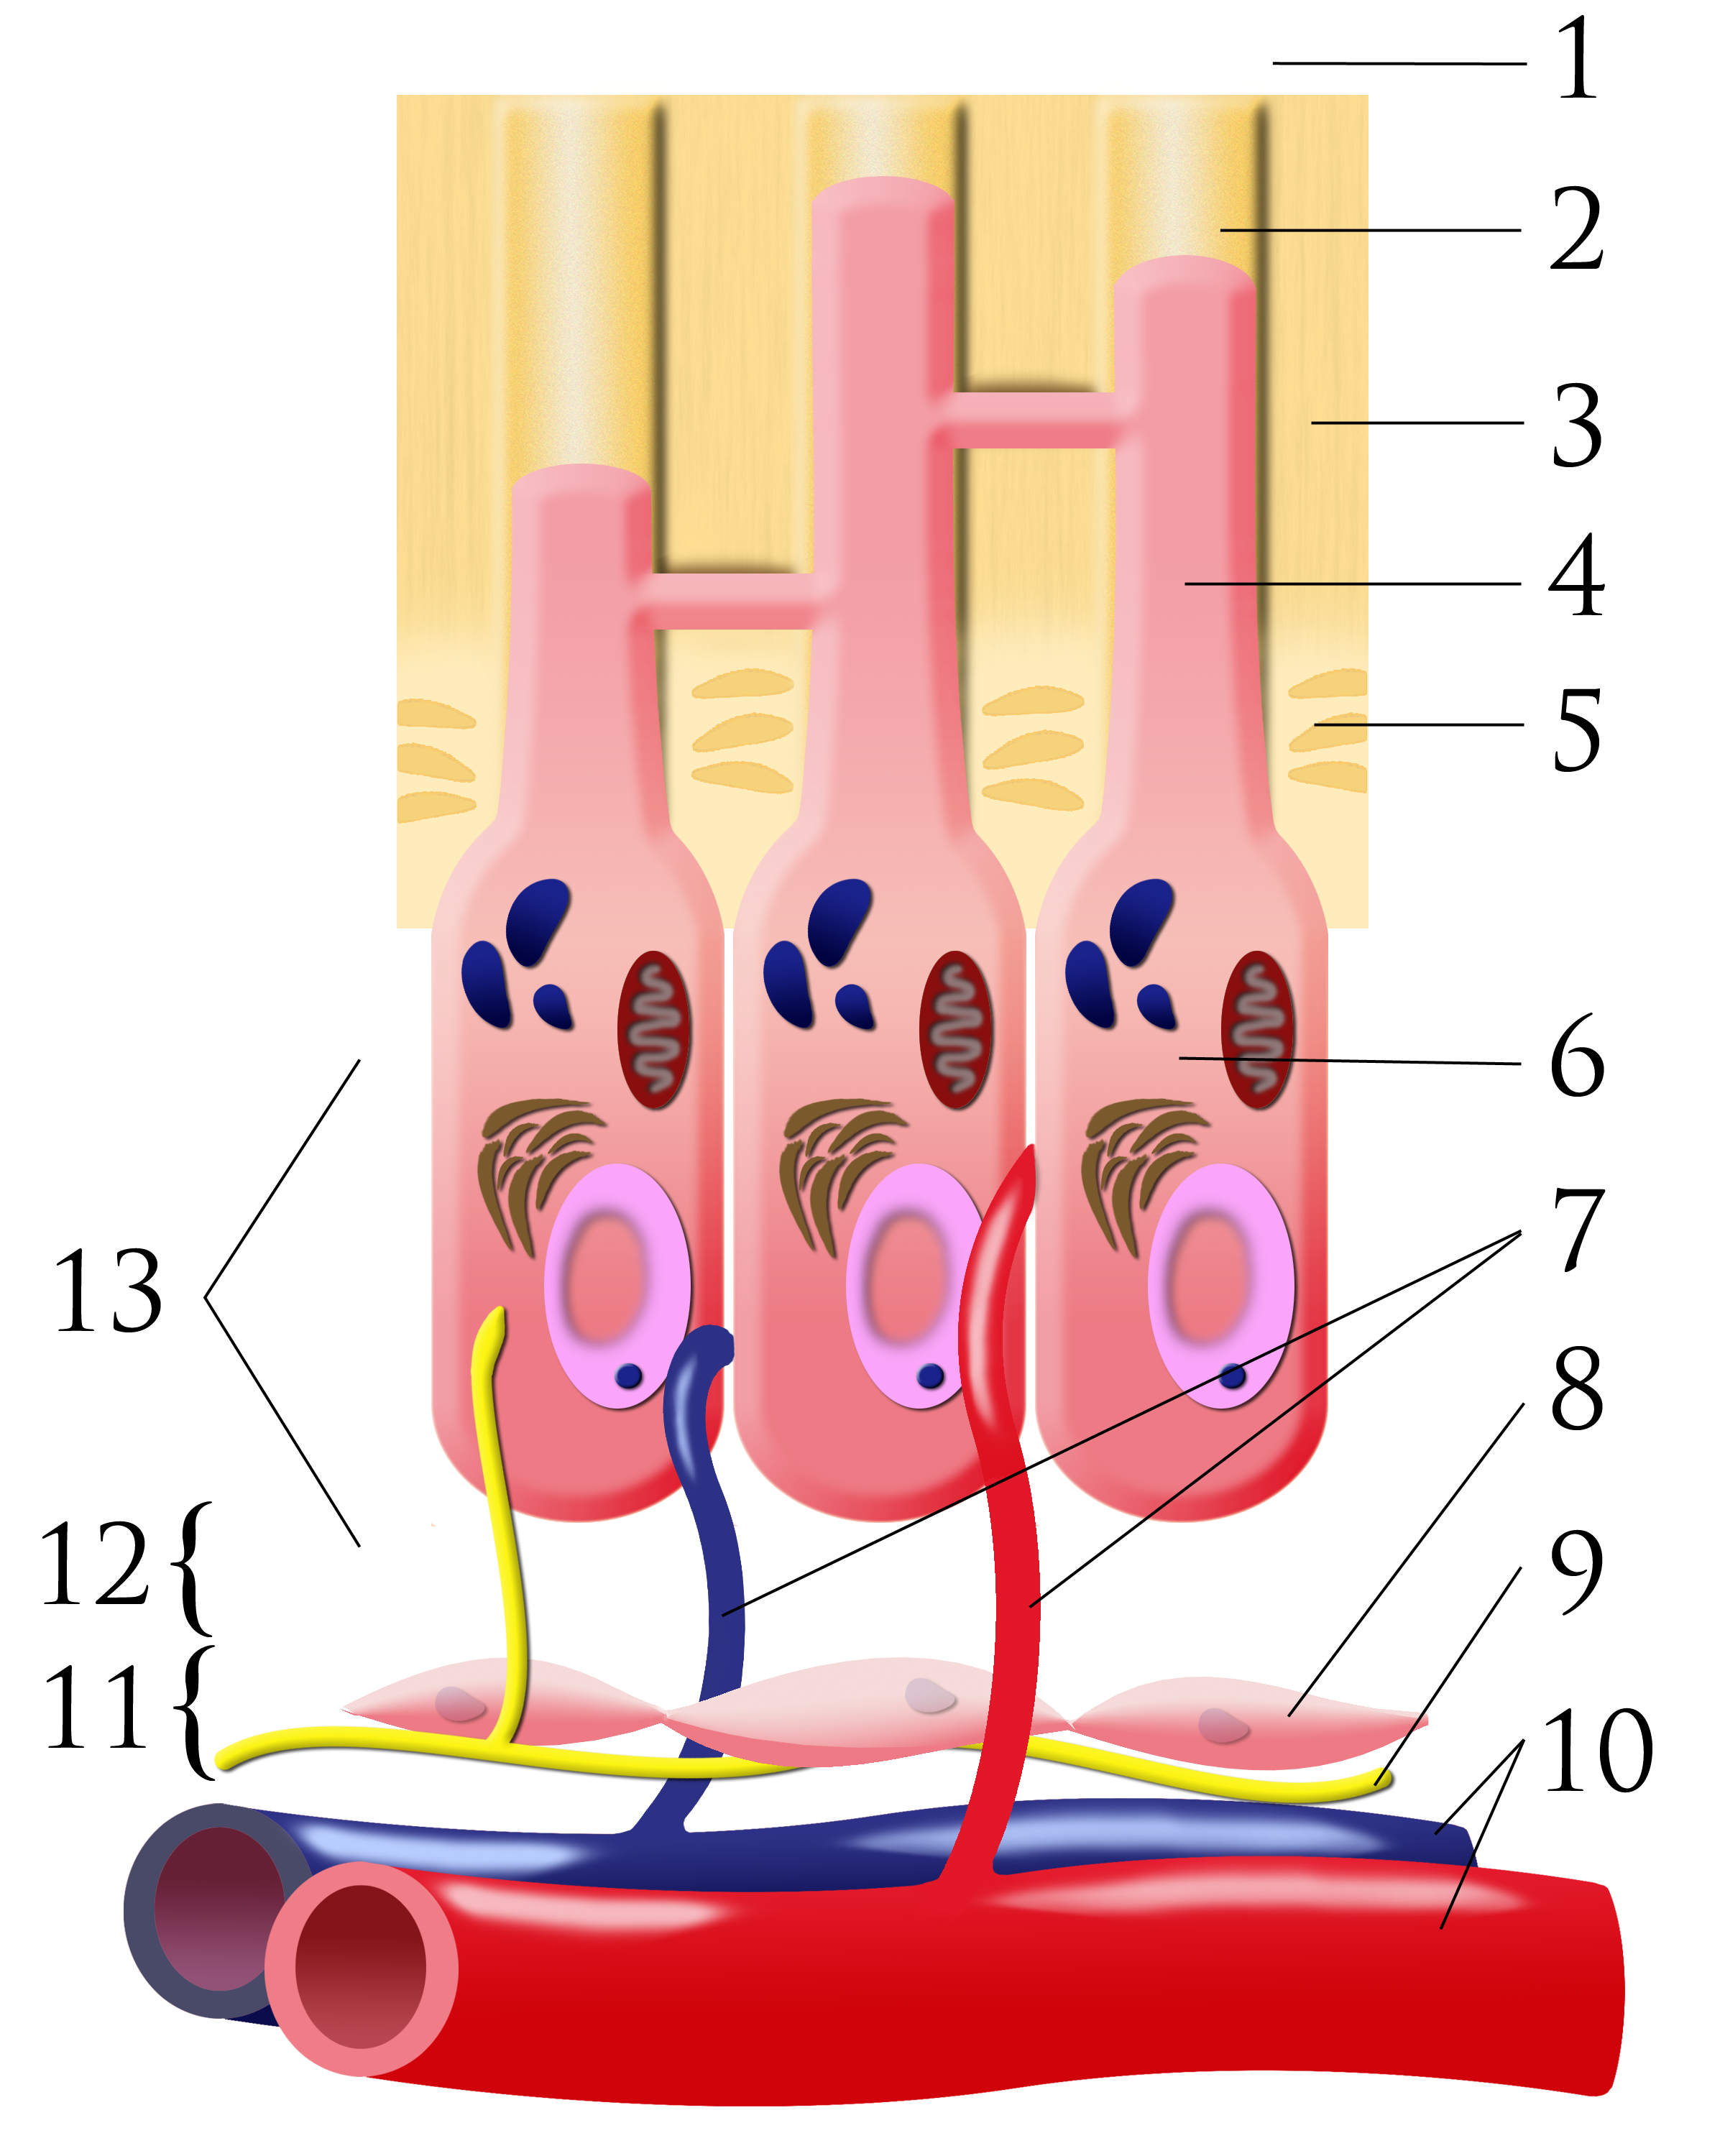
Number key: 1 outer-tooth direction; 2 dentinal tubule; 3 dentine; 4 odontoblastic process; 5 predentine; 6 odontoblast; 7 capillaries; 8 fibroblasts; 9 nerve; 10 artery and vein; 11 cell-rich zone; 12 cell-poor zone; 13 pulp chamber. This is a conceptual schematic, not a scale histological section.
Pulpal dentin junction.png · Ian Furst · CC BY-SA 3.0. None; original image reproduced without alteration.
Which cells form dentine, and where are their cell bodies?
Odontoblasts form dentine. Their cell bodies line the pulp–dentine border, with processes extending into dentinal tubules.
Understand the strategy before opening the bottle
Etch-and-rinse systems use a separate conditioning and rinsing stage before adhesive application. Self-etch systems use acidic components to condition and infiltrate without a separate dentine-rinsing stage. Selective enamel etching applies a separate etchant to enamel while following the system’s self-etch approach on dentine. These are strategies with different moisture and technique requirements, not interchangeable shortcuts.
Universal adhesives may permit several strategies, but universal does not mean every combination is compatible. Read the instructions for the actual adhesive, restorative material and curing approach, including any activator required with self- or dual-cure materials. Do not assemble a protocol by combining remembered steps from different brands.
| Strategy | Core distinction | Protocol risk |
|---|---|---|
| Etch-and-rinse | Separate conditioning and rinsing | Dentine moisture and complete infiltration |
| Self-etch | Conditioning and infiltration are linked | Do not import unrelated rinse steps |
| Selective enamel etch | Separate etching confined to enamel | Avoid uncontrolled dentine etching |
| Repair bonding | Existing restorative substrate is conditioned | Material-specific surface treatment |
Establish isolation before preparation
Saliva, blood and crevicular fluid can compromise the bonding surface. Plan rubber dam, retraction, matrix access and haemostasis before preparing a margin that will become difficult to isolate. A subgingival margin may make an otherwise attractive adhesive restoration impractical. Alternative restoration design or periodontal planning may be preferable to repeatedly attempting a contaminated interface.
If contamination occurs, identify the material, stage and substance involved. The appropriate recovery process differs before etching, after conditioning or after adhesive cure. Follow the system-specific instructions rather than simply applying another layer. Protection of adjacent teeth and soft tissues also matters because etchants and bonding agents are not intended for uncontrolled contact.
Application, solvent removal and light delivery
The adhesive must reach the entire intended surface in the manner specified, often with active application. Solvent evaporation and layer control are distinct steps; a glossy appearance alone does not prove adequate solvent removal. Under-cured or pooled adhesive can leave a weak interface even when the overlying restoration looks satisfactory.
Light-curing depends on the output and spectrum of the unit, tip condition, distance, angulation and exposure required by the material. Position the tip deliberately and protect eyes. A posterior proximal box, dark opaque shade or thick increment may receive less light than expected. Check the actual product’s limits rather than assuming one exposure time cures every resin and geometry.
Manage composite placement and stress
Resin polymerisation produces contraction and stress at the interface. Cavity geometry, remaining walls, increment form, material properties and cure influence that stress. Placement should permit adaptation without voids and adequate cure throughout; the permitted thickness of a bulk-fill product differs from a conventional composite. A flowable layer is not a universal cure for every stress or adaptation problem.
Matrices, wedges and anatomical placement help produce contacts and contours that can be cleaned. Bonding strength alone cannot support a thin cracked cusp or compensate for an overhang. Assess the structural plan first. The adhesive interface is one part of the restoration’s performance alongside tissue support, material bulk, occlusion and disease control.
Troubleshoot sensitivity and interface failure
Postoperative sensitivity can arise from pulpal inflammation, occlusal loading, cracks, exposed dentine or an imperfect seal. Examine the pattern, duration, stimuli, margins, contact and pulp before deciding that bonding failed. Persistent or worsening pain needs diagnosis rather than repeated application of a desensitiser or immediate replacement without evidence.
For repair, identify the old substrate: composite, metal, glass ceramic and zirconia require different surface treatments. Contaminated ceramic after try-in also needs appropriate cleaning. Record products and relevant steps so a failure can be investigated and future treatment planned. The most useful principle is consistency: choose a compatible system, deliver its complete protocol and verify the clinical result.
A distinction to remember
“Universal adhesive” does not mean universal instructions. Moisture control, solvent evaporation, compatible chemistry and adequate cure must all be achieved.
A cervical composite repeatedly debonds where the margin is below the gingiva. What should be reviewed before changing adhesive brand?
Reveal the reasoning
Assess contamination, margin access, substrate, retraction, product protocol and cure, as well as loading and the original design. A different bottle cannot solve an unisolatable margin or structural problem. Reconsider the restoration approach if a reliable interface cannot be achieved.
Test your recall
Why does dentine bonding differ from enamel bonding?
Show answer
Dentine contains collagen, water and tubules, while enamel is predominantly mineral. Conditioning and resin infiltration therefore have different moisture and substrate requirements. Depth, sclerosis and previous disease affect the interface, so a protocol suited to enamel cannot simply be transferred to dentine.